Pages

Friday 3 November 2017

Kaupapa - Background

Kia ora rā!

Nau mai haere mai. Welcome to my blog about the sound garden project.

From 2016 to 2020 I was a kaiako at Te Ara Whānui Kura Kaupapa Māori o ngā Kōhanga Reo o Te Awakairangi in Alicetown, Lower Hutt, teaching a music programme to Y0-8 tamariki (5-13 yrs) using the wonderful Orff approach.

In August 2016, just after I began teaching at the kura, I built two flipflopophones for my niece in Hokitika, and worked over the summer to create other instruments to add to this. The idea of making her a sound garden where she could have free access to music making as she grew up really appealed, and I sought out fun and interesting ideas for instruments that would engage her. In the end one flipflopophone became a marimba and I added a set of 5 "ding boxes" (played by stepping on) and a bell drum, both tuned in C pentatonic so they would sound good together.


As an artist I wanted the instruments to be visually appealing, and decorated the flipflopophones with images of crocodiles, sharks and coconut crabs to represent the origin of this type of instrument: the Solomon Islands and Papua New Guinea.


Kōwhaiwhai on the pipes represents our whānau, with the ngutu kākā pattern. 
Local plumbers Jeff Evans and Mark Keenan kindly donated the pipes.


Ding boxes (from Jon Madin's Build your own wacky instruments book) painted with a tūī on top and pikopiko on the side, a fern my niece loves to pick and eat. The mallets for the bell drum were made from chopsticks, and the drum itself from an LPG gas cylinder.


The idea of children being able to access musical instruments freely really appeals to me, and ever since I came across Saul Eisenberg's Junk Orchestra on the web I imagined that building sound gardens could be a fantastic way to make this happen. Thankfully, the tumuaki (principal) at the kura appreciates the value of the arts in education, and when I got back to the kura in January (2017) and showed her what I'd been doing, she gave me her backing to build one at the kura. Wow!

After planning what I would want in a sound garden, the next step was to find funding to pay for the materials. We were very lucky that Tātai Aho Rau - CORE Education came to the party and responded to my application for their Mātauranga Māori (Māori Education) Grant with a "yes" worth $7,000! Mouri ora! Kua whai huruhuru tēnei manu. 😊


Thursday 2 November 2017

Ngā Kaitautoko - supporters

Generosity

To build the instruments for the sound garden I needed a workshop and tools. Thankfully I had everything I needed from a very generous new friend named Murray Kilpatrick. I met Murray when I came around to help me learn the accordion in 2016, and when he saw my artistic projects (no instruments at that stage) he offered his workshop, should I ever need one! A month or so afterwards with new plans, I decided to take him up on his offer.

Murray playing my sound garden marimba

Murray is not only a woodwork and metalwork teacher with a well-stocked workshop, he's also a great musician who plays folk music and a luthier making his own guitars, mandolins and such in his spare time. Amazing! His workshop is full of interesting timbers, frames and bits and bobs for making these things.

The marimba, the flipflopophone, and the plumber

Deciding I needed some new teaching instruments for the kura in late 2016, I rang around plumbers in Lower Hutt hoping to find some pipe offcuts for little or nothing as I had in Hokitika. I got nowhere, but eventually a local plumber, Mike Ellis asked me what I wanted to do. Saying he had a soft spot for schools, Mike offered not just to give me some free pipe but to pay for all the materials for a contrabass marimba and flipflopophone! What a legend!


I used Murray's excellent workshop and tools to build the marimba over a week of my holidays plus the first week of the school year. Learning to tune the bars, including the harmonic overtones was tricky but very rewarding.

When I emailed various signwriters to get quotes on lettering stickers for naming the notes, Fine Signs and Wellington Signs generously offered to do it for free, and Phil from Fine Signs also cut out my kōwhaiwhai patterns on his vinyl cutter, saving me a lot of work when it came to decorating the instrument.

Ngutu kākā: Kākā make a lot of noise, so I thought this pattern appropriate.

To thank Mike Ellis, Murray and Phil I organised a performance during morning karakia at the end of term 1, and organised a local reporter to visit and do an article on it, in the hope that the sponsors would receive some publicity from their generosity. Two of our Y8 students presented a clever instrumental piece they'd composed on the marimba before the whole Y6 class performed a waiata using a range of instruments, including the flipflopophone I'd managed to construct the previous day!

One day wonder! Thanks Robyn for the help 😊

Mike Ellis and whānau, Nicole Swain from Fine Signs, and Murray & Julie Kilpatrick

As you can see, a lot of what I do has come about through the generosity and goodwill of others, and I am very grateful. That's not even mentioning my wonderful whānau, who back me in everything I do. These instruments are not specifically part of the sound garden, but I thought this was a good opportunity to acknowledge the people who made them happen, and it's all part of the story anyway! 

I am also grateful to my good friends Nadine and David, whose van I use to transport supplies, and the various other people who have offered advice on instrument making, discounts on their products (Resene and Tony from Plumbing World have been great here), and in particular to the team at Tātai Aho Rau - CORE Education, whose funding has meant the project could happen. Ngā mihi nui ki a koutou katoa!


He titiro ki te wāhi mahi rākau a Murray
Murray's workshop

Tuesday 31 October 2017

Te wāhi - An introduction to the project in te reo Māori, with a look at the site

Haramai! Anei ngā whakamārama  mō tēnei kaupapa i roto i tō tātou reo rangatira.
Come and visit my classroom. My happy place 😊

Te ruma puoro ki Te Ara Whānui Kura Kaupapa Māori

Anei anō he whakaaturanga mō te wāhi e tū ai te māra puoro.
Here is the site where the sound garden will go, just outside my class.

Te wāhi e tū ai te māra puoro
(Kia ora Māmā Michelle mō te āwhina!)

Friday 27 October 2017

Te hanganga - Woodblocks

Ngā Pouaka Rākau - Woodblocks

The first instruments I explored making were woodblocks and guiro. I aimed for mostly wooden percussive instruments in the project as I find them the most pleasing on the ear - too much metal can be hard going. We had some old 'Fascinating Rhythm Blocks' in the collection of instruments we hired from ONZA (Orff NZ Aotearoa), so I set about replicating these across a wider range of notes.


Of all the untuned percussion we use in the Orff approach, guiro are one of my favourites, probably because they are actually tuned! I like the little 2 toned guiro with a long and a short tube, so I wanted to try making a whole set of tuned guiro.

The round guiro in the picture above were my first attempt at this, but they took a long time to make (carving the grooves on a lathe and then tuning the chamber), plus I didn't have an easy source of wood (pine was a little too soft), so when I began making woodblocks with kwila as the tone wood I quickly turned to a new idea: using decking timber with grooves already in it! This created both instruments in one hit (or scrape!).

Woodblocks / guiro 

Gluing them together - it helps to have the gear!

Once I'd experimented with a few different sizes of blocks and worked out their pitches, I made a whole set and carefully sawed slots in the sides to tune them to the notes I wanted. This set has one octave (C to C), plus a high D and E. I mounted them on a temporary backing in a way that they can be easily removed, as we often use a pentatonic scale in Orff music, taking away some notes to make it easier for tamariki to be successful in their music making. 

The ability to remove notes easily and set up instruments in a pentatonic scale will be a feature of the sound garden, making it easier on the ears when students are playing randomly or out of sync with each other, and supporting success when playing as a group. 

Te tangi a ngā pouaka - Woodblocks in action

Wednesday 25 October 2017

Pouaka tanguru - Bass bar

Te pouaka tanguru - making bass bars

A bass bar is essentially a one-note marimba, a single bar suspended above a large box with the chamber tuned to match the pitch of the bar and therefore amplify its resonance. I couldn't find any information on how to make one of these at first, so I had a go at replicating the C bass bar my friend Priya let me borrow from her school. Priya is a fabulous Orff teacher who got me into this approach in the first place, and has been a great support and collaborator in my teaching journey.


I made the box using plywood to match the size of the original (made from MDF), tilting the bottom toward a small gap for rainwater to escape, then tried to tune the chamber. It was hard for my electronic tuner to pick up the note it made when struck, but I eventually set the aperture adjuster to what seemed like the right note. The next step was to make a bar.


With bass instruments like these it's good to adjust the harmonic overtones as well as the base notes when you tune the bars, as these are the other main sounds you can hear. In the picture above you can see where I've tuned the base note by scalloping in the centre of the bar, and tuned the first and second harmonic by cutting notches at the appropriate distances along the bar. You can also see where I mucked up and dropped too low, and had to raise the bar's pitch by removing wood at the ends! This doesn't happen often thankfully, but drilling with an auger means the effects can't be seen once the bar is in place.


The finished bass bar. I originally mounted this on rubber pads with a nail through the middle to hold it (see top photo) in the usual style, but vibration noises made me seek another way, and I eventually replicated a hanging method I saw on maker Chris Banta's website, which fixed the problem.

Unfortunately the I-pad I've been using to record footage can't pick up the deep resonance of this instrument, but I might add a video later if I take my own recording setup to work one day. Our akonga enjoy playing it during lessons, and I'm planning to make a G and A to add to this C bar.

Friday 20 October 2017

Pakakau teitei - Marimbas

Ngā pakakau teitei - marimbas

With a few smaller instruments completed, I thought I'd better get stuck into the big ones: a set of marimbas! The contrabass marimba I made earlier has been popular with students, and marimbas are such an asset in an Orff music programme, so I planned to build 3 alto instruments to complement this.

As with the contrabass I used Jon Madin's Make your own Marimbas manual, but due to the difference in PVC pipe sizes in Australia where he developed them, I had to reconfigure the design. I chose to use individual pipes to amplify each bar rather than a generic wooden box as the tone quality is much better, and the quality of sound is very important to me in what I make. 

Tuned 80mm pipes with caps

I built a frame for my first marimba based on the measurements I'd worked out, carefully sanding the edges to make it safe for little hands, and began tuning the individual pipes. This involved cutting up a 6m PVC pipe (downpipe), and reducing the length of each piece until it created the desired note, measured on an electronic tuner. These were then riveted onto a frame.


The pipe frame fitted snugly inside the marimba frame, where it is attached using carabiners for easy removal and transport. 


Mounting the pipes inside the frame.
The removable caps on some notes are for making an F into an F# when needed.

With the first frame complete, the big job of making the bars began. I had ordered kwila timber from Timspec in Auckland as this seemed to be the most environmentally certified and reasonably priced. After cutting it to the sizes specified I sanded each bar, calculated 22% of its length, and drilled a horizontal hole there to attach it to the frame. These points are where the node of the main soundwave generally lies, ie the area where it is vibrating the least, making it the best place to attach to the frame without dampening its sound.

Marking out the bars to tune and attach

I also marked the 30% mark of each bar, as I wanted to tune the harmonic overtones of the first 8 bars as well as the main note. This is where it gets complicated. When you hit a marimba bar (and other instruments) there are a number of different notes that sound, as well as the main note that your ear perceives as the dominant tone. By tuning the most prominent of these extra notes (overtones) to match or complement the main tone, rather than being random or out of harmony with it, the overall sound of each bar will be better. This is mainly done for lower pitched bars.

Tuning a bar for the marimba. 
You can see how I tune the bass note and the first harmonic

It's a tricky process to tune the harmonic overtones as you have to cut wood away from different parts of the bar as you go, and altering each one affects the other, but it can be very satisfying when you master it. I did this to the contrabass marimba I made earlier, and students can now play not only the main set of notes (using soft mallets) but the overtones as well, striking near the ends of the bars with hard mallets to produce notes 2 octaves above the fundamentals. 4 octaves from a 2 octave instruments is a bit of a buzz!
 
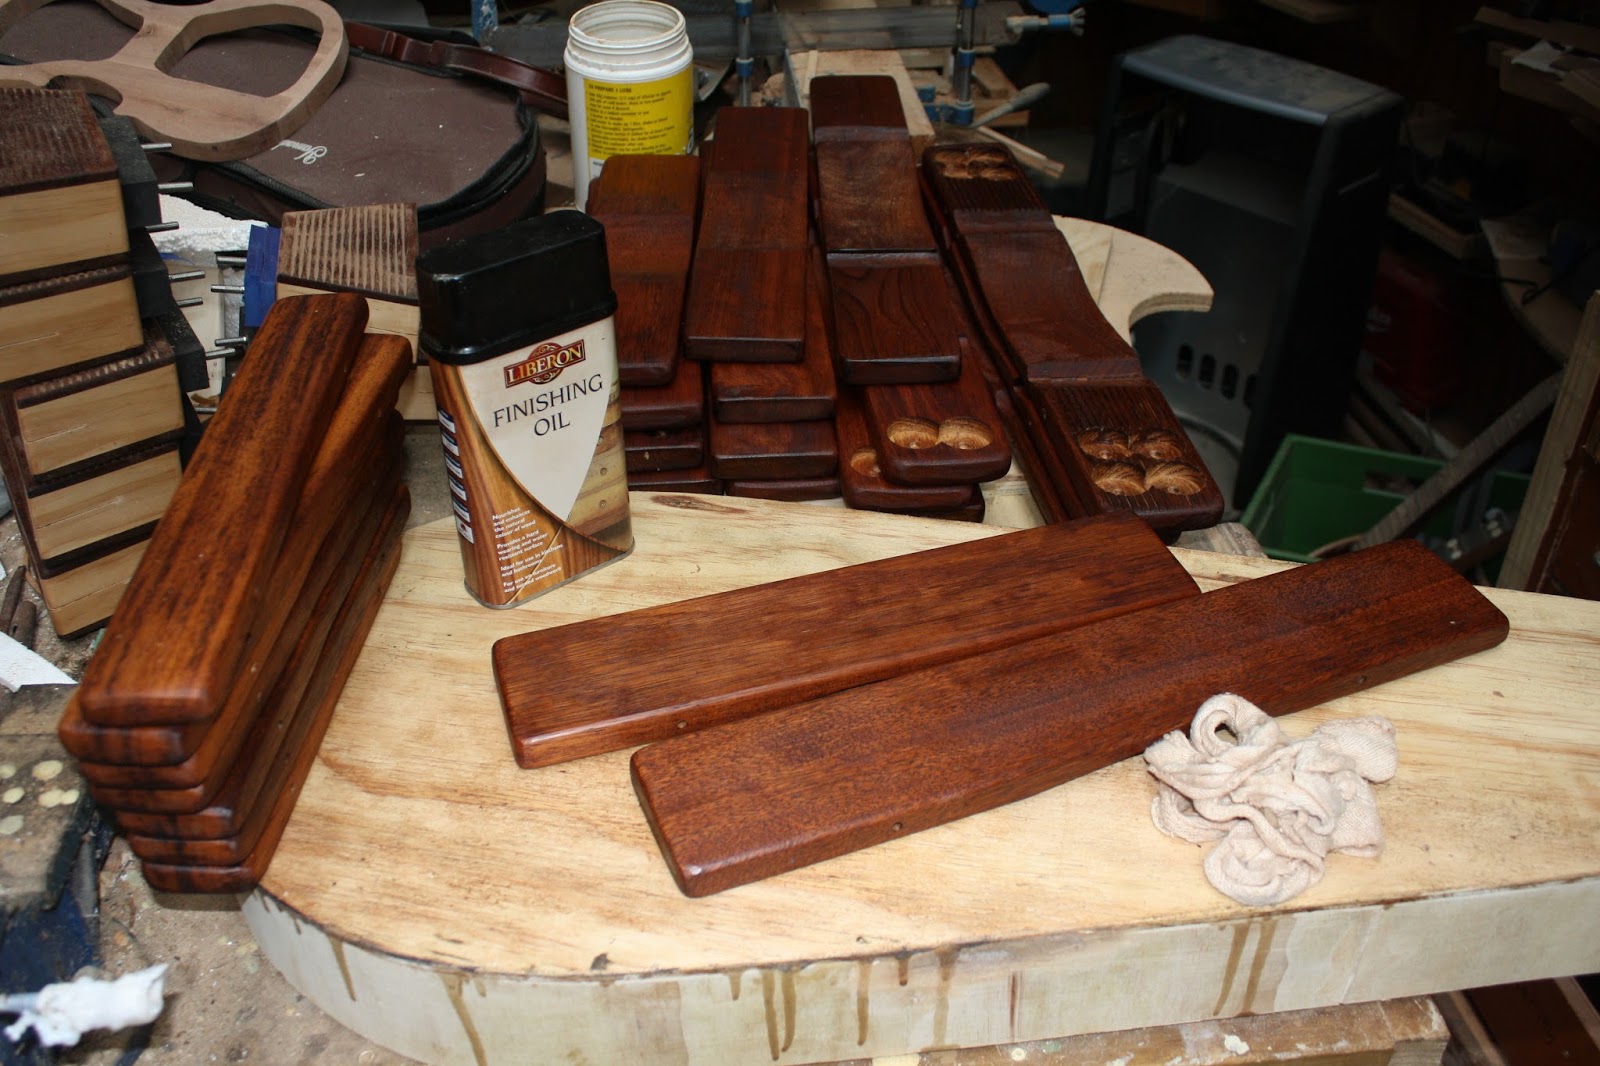
Oiling the bars to protect them and bring out the tone

Having deliberately left the bars slightly above their desired pitch, I oiled them with Liberon exterior oil before giving them a final light tune to bring them perfectly down to pitch (the oil drops the pitch slightly).

Gluing rubber strips onto the frame

As the rope based method I'd used on the contrabass didn't last very well, I wanted to work out a better way to mount the bars on my new instrument. Another marimba maker suggested rubber strips, but this meant the bars would bounce out of their nail holders, so I came up with my own system, drilling horizontal holes in the bars. 

Some marimbas have their bars attached by a cord that runs through the whole set, but I needed to be able to remove individual bars at times (eg to make the instrument pentatonic), so I experimented by threading a length of 4mm shock cord (bungy cord) through each bar and binding the ends with cable ties so they could be tightened if necessary. By hooking these onto nails inside the frame, the marimba was complete!


Finally, I made mallets by drilling through rubber bungs and attaching these to wooden dowels, which I later stained, and named the notes using vinyl stickers kindly supplied by David Calwell from Wellington Signs.


Here is the completed marimba in action. I've since made two more, a lot faster now I've got a successful prototype - they only took 5 days to make both! As I think these instruments are real assets, I've decided to use the last few days of the project to make another two. 
 
The marimba in action


Murray showing us how it goes!

Sunday 15 October 2017

Ngā Pouaka Tangi - Ding Boxes

With 3 marimbas completed it was time to enjoy exploring some of the smaller taonga. The ding boxes I made for my niece's sound garden in Hokitika were a lot of fun, and I decided to make two pentatonic sets for Te Ara Whānui, particularly for the littlies. A ding box is a wooden box with a tuned chime inside. When you stand on the lid this hits a striker, which in tune causes the chime to ring.

Ding box internal mechanism

A visit to the local metal recyclers resulted in a set of narrow aluminium pipes, and I tuned these to the notes C, D, E, G, A & C, and drilled holes at the nodes to mount them. After making a prototype box to get all the dimensions right and make it as low to the ground as possible, I used an assembly line process to put the rest together:


Prototype and assembly line

When all the boxes are stood on at once, this creates a lot of different notes ringing for a long time - up to 22 seconds. To have more control over the length of each sound, I experimented with fitting a silencer to the boxes, so the chime would only ring when the lid was pressed down, and stop once the person's foot was off it. This means you can choose between short notes for playing melodies, or long ones when you want them.

Construction 

Here are the finished instruments, one of the two complete sets. They have been painted with white undercoat by my Y5 students, who will continue the process next year, applying their own artwork to produce colourful instruments for the collection.


Te tangi a ngā pouaka - ding boxes in action!

Tuesday 10 October 2017

Kōrere Pūtētere - Chimes

When I designed the sound garden I wanted it to encompass a range of different sound qualities, with metal as well as wooden instruments. A set of chimes was my next project. These would be deeper in pitch than the ding boxes, and hopefully give a good ringing sound. The first step was to scout around the local metal recyclers and find brass pipes.

Brass pipe for chimes

Unlike the soft aluminium pipe used for the ding boxes which could be cut with a drop saw, the brass pipes had to be tuned using some kind of metal cutter. Thankfully Murray's metal workshop was up to the job, and his machine made short work of them.


Murray's metal cutter

Bart Hopkin's Musical Instrument Design book offers a method of enhancing the sound of your chimes by inserting stoppers to tune the internal air chambers, but this requires the ends be cut on an angle to make the air vibrate inside the pipe. Wanting the best sound from my chimes, I cut the ends on a 45 degree angle, but have yet to tune the air chambers accurately - it's tricky!

The finished chimes mounted in a frame

After building a wooden frame to hold the pipes, I mounted them using shock cord, hooks and loops in a method that took a little time to get right. Here they are in action at the workshop. I've since decided to make another, higher set as I think the highest notes on this pentatonic set sound best:

Te tangi a ngā pūtētere - chimes in action

Thursday 5 October 2017

Ngā Kōrere Tanguru - Flipflopophone


Music with Jandals!


Flipflopophones are fun instruments for kids. Named after the things you hit them with to play (jandals/flipflops/thongs depending on your country), they seem to have originated in a number of countries, including our neighbours in Te Moananui a Kiwa, Papua New Guinea and the Solomon Islands. Phil Dadson and his mates did interesting things with them in their band From Scratch a few decades ago, and there are some interesting videos online where people perform using their own versions. Our tamariki at the kura like playing the set I made earlier so I decided to make a bigger version for this project.

Pipes tuned by cutting to length

I bought 100mm PVC pipes from Plumbing World in Pito-one - thankfully they've been giving me a good discount on products for the kura as it's expensive stuff. Tuning them is fairly straightforward, you just cut each pipe to length and trim it until your electronic tuner thinks you're in the neighbourhood of your note. I say neighbourhood as mine likes to offer a number of ideas of what it thinks the note could be, so it's a little tricky at times to work out which is correct. Overtones, I guess.

 
Making the frames: cutting tool and frame pieces

The frame top for holding the pipes


Constructing the frames (timelapse)


With the frames holding the tuned pipes I added some extra pieces of timber and riveted the bends to these to keep them in place. The straight lengths can still be removed for ease of transport. The completed flipflopophone covers 2 and a bit octaves of bassy goodness, as you can hear below:


Te tangi o ngā kōrere tanguru - the flipflopophone in action!

I was a bit māuiui for a few weeks while building the flipflopophone and my voice is hoarse in the video. It made teaching interesting that week!

Sunday 1 October 2017

Ngā pūtētere - More chimes!

With a just a few days left in the workshop to complete the sound garden instruments this year, I spent a day making another set of chimes. These are the next octave up from the original set, and as I suspected the sound is even better. I hadn't quite finished mounting them in the frame in this video but you can hear the lovely sound they make.


I am also midway through the construction of another two marimbas, and managed to build two complete frames in two days last week, as you can see in the video - pretty good going! With the end of the year drawing close I am working hard to get the best results from the time and money that remains. The second set of chimes is a good addition in this respect.

Saturday 30 September 2017

Te Pani Peita - Painting the flipflopophone

With all the instruments completed last year*, our Year 6 and 7 students have been busy painting the taonga. The kōrere tanguru (flipflopophone) took a few sessions to complete, but it looking awesome now it's finished.
 
 Te Arani Vulu and Zoe Ryall giving the kōrere tanguru a second coat of orange

note that the dates on blog posts are incorrect - I've set the dates in reverse order so that you can scroll down from the top to the most recent. These photos are from term 1 2018.

Leigh Te Ahuru-Lam Sheung

Te Purewa Akuhata, Ace Samuels and Kaimana Tawhai 

Malenia Kaiwai paints the frame
  
Kaimana Tawhai working with care

Aroha-Tia Taripo, Ace Samuels and Te Purewa Akuhata

Lazarus Wilson, Rhobe Rahiri and Leigh Te Ahuru-Lam Sheung

The finished product: Kōrere tanguru / flipflopophones in the classroom


Taonga filling up the room!

Saturday 23 September 2017

Te Pani Pakakau - Painting the marimbas

Our Year 6 & 7 students did a great job of painting the marimbas, and worked with care to ensure the instruments look their best. 


Sarah Moeke-Alefosio painting a marimba frame

3 finished and one undercoated: painting inside on a wet day.

Kimiora Ratana, Ja'ziyah Rawiri-Hereora-Komene and Cleveland Rawiri Randall practicing synchronised painting. The beauty of it!

Rakena Rangihuna and Aria Toia also tried the zen approach.

Finished marimbas!

All the sound garden instruments (including these pouaka tangi/ding boxes) are now painted and ready for the next exciting step, where our students will decorate them with their own patterns using stencils. I can't wait to see their designs bring the artwork to life!


Click here to see more recent posts:
- painting the instruments with stencils
- videos of our tamariki playing their music
- a snapshot of the music programme